Welcome

I am hoping that this blog will evolve into a space for those who create, those who imagine and those who enjoy life's sweet little things. A place where information flows and inspiration can be found and shared with all who enter this space.

Wednesday, June 13, 2012


Caramel Fudge
1 tin (395g) of sweetened condensed milk
75g of caster sugar
150g of brown sugar
2 tablespoons of golden sugar
2 tablespoons of glucose syrup
80g of butter, cubed

1- Grease and line (bottom and sides) a 20cm square or a 25 x 8cm rectangle cake tin.
2- Place all the ingredients in a medium heavy-based saucepan and heat over low heat, stirring until the sugar has dissolved (5 to 10 minutes) - Do Not Boil. Keep Stirring. It Burns Easily.
3- Increase the heat to medium and bring to the boil, stirring constantly. Cook (Keep Stirring) for about 8 to 10 minutes or until it thickens. Do Not Stop Stirring. Take off the heat.
4 - You can pour the mixture into a small bowl or you can just do this in the saucepan (just will take a little longer if you leave it in the saucepan). Beat with an electric mixer for about 3 minutes or until it has cooled slightly and is thick (Do Not Be Tempted To Taste It - you will burn your tongue). Pour the fudge into the prepared pan, smooth the top with a spatula. Leave for 30 minutes then cover with plastic wrap and pop in the refrigerator for a few hours.

Warning - Do Not be tempted to taste at anytime during the cooking process - you will burn your tongue (I know), actually you shouldn't touch it at all - just wait until it has cooled down.

Store fudge in an airtight container in the fridge for 2 weeks.

Let the fun begin


Add flavours to the fudge like - mint, Kahlua, coffee, vanilla. Mix in the flavour in the beginning of the process with everything else.
Add nuts to the fudge - pecan, macadamia, cashew. Mix through the fudge just before pouring into tin or sprinkle on top as soon as you pour it into the tin.
Dip fudge in chocolate.
Cover shortbread in fudge.
Cut the set fudge into shapes using little cookie cutters.
Make fudge pops - cut fudge into a shape and push a stick into the piece of fudge, the dip in chocolate.


Or just eat the fudge just right out of the tin !

Saturday, February 11, 2012

Red Velvet Cupcakes

Red Velvet Cupcakes


This recipe is from the lovely Leony from Ma'cake who has kindly said that I could share this recipe, you should visit her she has some lovely recipes and does absolutely beautiful work. Here is the link to her recipe or you can just read it here.
http://blog.macake.com.au/2010/06/red-velvet-cupcake-recipe/#1#1

I must say these were delicious, it is the first time I have actually tasted red velvet - I know it's strange, so I will just leave it there, so that being the case I honestly can't compare, but everyone who tasted these loved them. I would say that it isn't absolutely necessary to have both the cream cheese filling and the white chocolate butter cream, although it is rather yummy with both and well when I indulge I go all the way.

So here it is

Red Velvet Cupcakes (makes about 30)

Ingredients
3 ¼ cups of plain flour, sifted
150 gr unsalted butter, room temperature
2 cups castor sugar
3 large eggs, room temperature
2 1/2 Tbsp red food coloring
3 Tbsp unsweetened cocoa
1 1/2 tsp vanilla extract
1 1/2 tsp salt
1 1/2 cups full cream milk
1 1/2 tsp plain yoghurt
1 1/2 tsp baking soda

Directions
Preheat oven to 175°C and prepare cupcake trays.

Using an electric mixer, cream the butter and sugar on medium speed until very light and fluffy, about 5 minutes. Add the eggs, one at a time, beating well after each addition. In a small bowl, whisk the red food colouring, cocoa, and vanilla together. Add to the batter and beat well.
Red Batter
Stir the salt into the milk. Add milk to the batter in three parts alternating with the flour. With each addition, beat until the ingredients are incorporated, but do not over beat. Stir the yoghurt and baking soda together and add to the batter and mix well. Using a rubber spatula, scrape down the batter in the bowl, making sure the ingredients are well blended and the batter is smooth.

Divide the batter among the prepared pans. Arrange the oven racks in the upper and lower thirds of the oven and bake the cupcakes, switching positions of the pans halfway through baking, until a tester comes out clean, about 20 minutes. Cool the cupcakes in the pan for about 10 minutes, then remove from the pan and cool completely on a rack before icing.
Naked Red Velvet cupcakes

Cream Cheese Filling

Ingredients
300g cream cheese at room temperature (spreadable cream cheese or mascarpone are both fine) I used cream cheese
75 gr unsalted butter, softened
1 teaspoon vanilla extract
2 cups icing sugar, sifted

Directions
With an electric mixer, blend together cream cheese and butter until smooth. Add icing sugar and vanilla extract. Mix on high and beat until light and fluffy. Make a 1cm diameter hole in the middle of the cupcake about 3/4 depth and fill using a piping bag. I used an apple corer to make the holes.


Filled with cream cheese filling
Filled with cream cheese filling and dusted with icing sugar


White Chocolate Butter cream

Ingredients
80ml cream.
150g white chocolate
200g unsalted butter, softened
80g icing sugar sifted

Directions
Bring some water (about 2cm depth) to boil in a small saucepan. Remove from heat. Place a stainless steel bowl over the pan ensuring it does not touch the water. Add the cream and chocolate, stir until melted and smooth. Set aside to cool a little.

Beat the butter until light and creamy then slowly beat in icing sugar until thick and white. Beat in the cool chocolate mixture.

Pipe the icing onto the cupcake using a star nozzle by holding the nozzle vertically approximately 1cm from the cupcake, starting in the middle then working around the outside before returning to the middle to create the peak. Of course you can pipe any way you like or just dollop a spoonful of icing onto these. Enjoy xx 

Red velvet cupcake, cream cheese filling all topped off with a light white chocolate butter cream


Monday, January 30, 2012

Rose pops


This is not my original idea - I have seeing it done before while looking around on google, not entirely sure who to give the credit to, however I did see roses and then had a play with ways of making these and want to share what I came up with to create these sweet edible roses. I had planned on making these again and having some better photos for this blog post but got rather busy, and well valentines day in around the corner so I made an executive decision to do the post with my first attempt ones rather than wait.
Basically if you have made fondant or gum paste roses this is very much the same thing except that you have cake/cookie pop mixture in the middle.
As with most things there are many ways to create a similar thing - a long way and a short way, well which ever way you go with these they do take time, but are definitely worth the effort.
I did the long version - Made my own modeling chocolate, and made chocolate mud cake and ganache to make the cake balls.


What you need -
Cake pop/ball mix (cake crumbs mixed with icing of some sort OR cookie crumbs mixed with cream cheese OR fudge)
Chocolate or candy melts in a colour of your choice (I went with red candy melts)
Modeling chocolate OR fondant (I made my own Red modeling chocolate and used green fondant for the calyx - got a bit lazy)
Sticks (I use the white 'paper' cookie sticks - that's what I call them)
Rose petal cutter
Calyx cutter
Rolling pin


Shape the cake pop mixture into tear drop shapes, dip the end of the stick into melted chocolate and insert into the fatter end of the teardrop cake ball. Chill these in the fridge.

Once these are chilled coat/dip into chocolate. Allow chocolate to set.


Make the rose petals -
Roll the fondant or modeling chocolate out thin and cut out petals, thin out the edges of the petals.
Wrap a petal around the cake pop forming a point at the top, wrap the next petal overlapping, add 3 more petals over lapping each one to form a rose bud. Add 5 more petals to finish the full rose.


Finish the roses off by cutting a calyx from the green fondant and slide it up the stick and onto the base of the rose, using a little bit of water to attach it.

Done ! I appologise in advance for the lack of certain details in this post - I just wanted to get it out before Valentines day and well being 3am it's either do it like this or wait for a few weeks when/if I quieten down.

Bunch of Rose Pops

Inside Rose bud

Tuesday, November 1, 2011

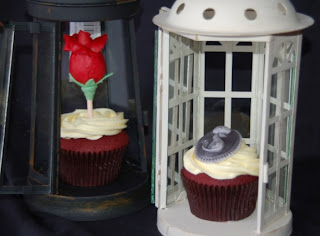
Surprise cupcake toppers

BE SURPRISED - CUPCAKE TOPPERS

Well I must admit that I have been a little bit obsessed with these lately -  there is so much you can create with these and they are just so much fun. I wanted to share the 'how to' for these for ages and finally am sitting down doing it xxx

So lets get to it.

What you really need, Fondant, corn flour, circle cutter, Rolling pin, polystyrene ball, imagination. Useful extras, impression or textured mats, variety of cutters,


What you do


Roll out your fondant fairly thin and cut a circle. Dust the polystyrene ball with cornflour. Place the circle on the  polystyrene ball and gently smooth and 'mould' it on to create your hollow half ball. Leave to dry for about an hour (depends on weather), gently ease it off and leave to dry completely.
TIP - if you find that the fondant is sticking to the ball dust the fondant circle with cornflour before putting it on to the ball.


Variety -
Using an impression mat emboss the fondant circle before it is placed on the ball.
Cut out shapes in circle before placing on ball to dry.
Decorate the fondant circle while it is on the ball using fondant cutouts etc
You can use a variety of sizes of polystyrene balls and circle cutters to create various sizes.


There is so much I could say about what you can create with these but I will leave it to your own amazing imagination.

Thursday, October 6, 2011

OUT OF THE BOX - Cinnamon swirl cupcakes

Cinnamon swirl cupcakes

Light, moist vanilla cinnamon cupcake with a smooth fluffy cream cheese icing and then draped with a sweet sticky cinnamon glaze - oh these are so lovely - you will be forgiven for not sharing.

Not everything has to be baked from scratch, I don't think there is anything wrong with using a cake mix - yes I don't always bake everything from scratch, and I like it if it makes my life easier - which at times it does, and this is one of those times and oh it makes this recipe just that much easier and quicker. These were so delish, I managed to resist eating them all in a day and kept a couple to 'time taste test' and I must admit the last one was possibly better than the first so as long as they are kept in the fridge they will be good for a couple of days (if you can resist them).

This makes about 24 regular size cupcakes

1 box vanilla cake mix
What ever is required according to the box (eggs, milk, butter)
1 cup brown sugar + 1 1/2 tsp cinnamon, mixed together

Preheat oven to 180 deg C. Line your muffin tins with liners.

Follow the instructions on the cake mix package and mix accordingly. 

Fill muffin tins about 1/4 of the way full. Sprinkle a heaping teaspoon of cinnamon/brown sugar mixture over batter and cover with another spoonful of cake batter. Sprinkle another teaspoon of cinnamon/brown sugar over the top. Cups should be about 2/3 full (try not to fill them more than that).  Using a skewer or other pointy object , swirl the cinnamon sugar through the batter gently.

Bake according to package instructions or until tops spring back when lightly touched. Cool on a cooling rack.


Icing:
250g cream cheese, softened
115g butter
1 teaspoon vanilla extract
3 cups icing sugar

In the bowl of a mixer, beat cream cheese, butter, and vanilla on medium-low speed until smooth. Add icing sugar and beat on low until just combined. Scrape the sides of the bowl and increase speed to high and beat for 2 minutes. Pipe or spread on to cupcakes and place in the refrigerator until ready to glaze.


Glaze:
115g butter
1 cup brown sugar
1 1/2 teaspoons cinnamon

In a small saucepan over medium heat, melt butter with brown sugar and cinnamon until combined and pourable but not boiling. Alternatively place ingredients in a microwavable bowl and heat in the microwave - but watch this carefully. Spoon over iced cupcakes and immediately place in the refrigerator to set.


TIPS - These are good without the frosting, so if you are really pushed for time or not such a sweet tooth you can have them without the icing and the glaze, I of course recommend that you have the lot though.
Add some chopped nuts - I'd recommend pecans but anything will do, or don't add the glaze and sprinkle with cinnamon and sugar.
I used Greens Vanilla cake mix to make these. If you prefer you can use your regular vanilla cupcake recipe instead of a cake mix.

Friday, September 2, 2011

Cookies for fathers day


This is a quick 'how to' for fathers day cookies - I always like to make a little something special for the wonderful people in my life, being a little busy at the moment I thought I'd do something super fast for fathers day and this is what I came up with.
With fathers day happening in Australia on Sunday I thought I'd do a quick post to share. Of course these shirt cookies can be given at any time and with a little imagination can be personalised to suit any occasion.

1. You need a rectangle cookie, (home made or bought) and fondant/RTR in colour of your choice. Roll out the fondant/RTR (emboss this now if you like).

2. Spread a thin layer of corn syrup or butter cream onto your cookie and place fondant/RTR over cookie, gentle secure icing to cookie ensuring that the sides are nicely covered.

3.Trim the excess fondant/RTR.

4. Roll out fondant/RTR and cut a small square for the pocket and a long strip for the collar - as shown in picture.

5. Roll out a different colour fondant/RTR for the tie, cut tie and make a small triangle shape - as shown in picture.
6. Put it all together - using a damp paint brush, moisten tie and stick it in place, moisten the short length of the collar and shape being sure to join the points together just on top of the tie and stick onto shirt, moisten the pocket and stick in place, using a quilting tool you can add the stitching detail on the pocket.

Sunday, August 21, 2011

Making moulds

Amazing mold putty, wow I love this stuff, although rather pricey it does go quite far, it is non toxic and easy to work with and makes fantastic little moulds.
No special equipment required - only thing is you must be organised because you get about 2 minutes to work with it.

Ideally make your original out of fimo clay, or get something interesting that you want to make a mould from.

 I don't weigh the 2 parts of the putty I just get an equal quantity of each part (white and yellow)  and quickly work them together - I mean quickly, no time to get interrupted - you have about 1 minute so work fast. 


So once it is evenly mixed together you roll it into a nice neat ball, again do this fast, very fast.


Now you are ready to make the mould, press the putty over your original object, start in the middle of the object and work the putty over the entire object, pressing down gently but properly to ensure you get in all the details. Don't play around too much - just push it on and leave it - if there are thinner areas you can just apply more putty later. Just leave it for lets say 30 minutes to be safe. Go away and do something else, do not be tempted to check it out or anything, just leave it alone.

After 30 minutes you can touch it - it should be ready to 'unmould' your original and walla your mould is made and ready to use. If you will be using it for food - wash the  mould first.


Fondant spider

NOTE - The putty does come with full instructions, that you should read through first.
You can use the moulds to make a variety of things including edible items like chocolates, fondant decorations, ice, as well as baked things (it can withstand temperatures of up to 395 deg F - although I haven't tried it yet). Ensure that the item you are making the mould from has be thoroughly cleaned before you begin.

Be creative and have fun xx