Welcome

I am hoping that this blog will evolve into a space for those who create, those who imagine and those who enjoy life's sweet little things. A place where information flows and inspiration can be found and shared with all who enter this space.

Friday, January 28, 2011

Tips with baking decorated biscuits

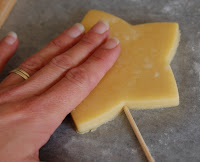
Unbaked biscuit on a stick

Shaped biscuits need to hold their shape while baking and need to bake evenly. I have include tips on working with the cookie dough, cutting out biscuits, inserting sticks, things that I do to make baking cut out cookies easier. You can refer to baking tips with regards to ingredients (room temperature, preheat oven and so on), as well as the shortbread recipe. I will be posting another sugar cookie recipe too, as well as tips on decorating and packaging biscuits. I do hope this is helpful.

1 - Dough needs to be chilled, it makes it easier to work with and biscuits will hold their shape better. Wrap flattened disc of dough in plastic wrap and pop in the fridge)
2 - I roll my dough onto lightly floured baking paper, I find that it is easier to lift biscuits. (can place hand under baking paper and biscuit and use other hand to lift biscuit off - not sure if this makes sense)
3 - Use spacers when rolling dough so that all your biscuits are the same height thus will bake evenly.
4 - You can roll the soft dough on baking paper to the desired thickness, then pop this onto the baking tray and cool in the fridge. It is much easier to roll soft dough.
5 - You can use cookies cutters or a template to cut desired shapes. I find that if I laminate my template it is more sturdy to work with. Dip cutters into flour before cutting this ensures the dough wont stick to the cutter.
6 - When inserting sticks into biscuits I (A) place one hand gently onto the surface of the biscuit and then slide the stick into the biscuit about half way up, (B) I then flip the biscuit over (this is when working on baking paper comes in very handy), and if the stick is showing through the back I roll a strip of dough and (C) cover the stick. Flip the biscuit over onto the baking tray (cool in the fridge if it is soft). I have included photos as a visual aid.
7 - Bake similar size biscuits together, and adjust the baking time (i.e. shorten the time for smaller biscuits).
8- Leave biscuits on tray to cool down a bit before transferring to wire racks to cool completely. The biscuits are a little soft straight out of the oven, leaving them on the baking tray for a few minutes allows them to set up, thus less likely to break or change shape.
9 - Store cooled biscuits in an airtight container, or freeze them.


A-Slide in stick


B- Flip biscuit over


C- Smooth dough to cover stick


Thursday, January 27, 2011

The Essential Cake Decorating Guide

I got this book a few years ago (4 October 2003 to be precise) as a Thank you from a lovely friend who I had helped with her daughters birthday party. And what a lovely book. It is filled with inspiration, education and beautiful pictures. It has a bit on the history of cake decorating, and an incredibly thorough glossary of terms, a great  illustrated section on equipment, all the basic cake recipes (from 15cm to 30cm size cakes), chocolate decorations, all the basic icing recipes with variations,  great instructions working with all the icings, modelling, sugar flowers, piping....and on and on. Then all the different cakes, a lovely variety of gateaux, children's cakes, celebration cakes and more. All this educational knowledge is accompanied by a multitude of fantastic photographs. What more would a wanna be decorator need! Time.

Peanut Butter and Snickers Muffins

Peanut-butter and Snickers Muffins
Recipe adapted from Nigella Lawson

These muffins are lovely, not too sweet and so easy to make. They are best eaten on the same day. Warm is best!!!

250g plain flour
6 tablespoons (85g) caster sugar
1 1/2 tablespoons baking powder
pinch of salt
6 tablespoons (160g) crunchy peanut butter
60g melted butter
1 large beaten egg
175ml milk
About 180g Snickers, chopped (About 3 medium size bars)

Preheat oven to 200 deg C and line a 12 bun muffin tin with paper cases.
Sift together flour, sugar, baking powder and salt. Mix in the peanut butter until it looks like coarse crumbs. Add the melted butter and egg to the milk, and then stir this gently into the 'dry' peanut butter mixture. Mix in the Snickers pieces and fill the muffin cases about 2/3 full.
Cook for 20 - 25 minutes, the tops should be risen and golden. Leave in the tin on a wire rack for 5-10 minutes before taking out of tin and cooling the muffins on a wire rack. 
If making mini muffins shorten baking time.


Wednesday, January 26, 2011

Millionaire Shortbread


Millionaire Shortbread
Recipe adapted from Nigella Lawson
Three layers of different textures, crisp biscuit, soft caramel and smooth chocolate, this combination is just delicious, rich and rather moreish so I suggest cut small pieces, share with friends but sneak some for yourself to enjoy later. Great thing is this stores fairly well, either in an airtight container in a cool place, or frozen for a few months and this may look tricky to make but actually is quite easy and so worth the effort.

Biscuit Base
225g plain flour
75g caster sugar
175g butter

Caramel
395g tin of sweetened condensed milk
4 tablespoons golden syrup
200g unsalted butter

250g plain or milk chocolate broken into pieces

Grease and line base of a brownie tin (approximate size of tin - 22cm x 22cm OR 28cm x 18cm). Preheat oven to 170 deg C.
In a bowl place flour, sugar and chopped up butter and rub in the butter with your fingers. This dough will be rather sandy but will stick together. Press this in the lined tin and using the back of a spoon or your hands smooth it out. Prick this with a fork and bake for 5 minute, lower the oven to 150 deg C and bake for 30 -40 minutes, until it is a pale golden. Cool in the tin.

In a large microwavable bowl melt the butter, then add the condensed milk and the syrup, whisk well until the butter is completely incorporated. Heat in the microwave at 1 minute intervals for about 6 minutes, until it is boiling. Be sure to stir the mixture thoroughly every minute or even at 45 second intervals. This is ready when it has thickened and turned a light golden caramel colour. Pour this over the cooled biscuit base and leave to set.

Place the chocolate in a microwavable bowl and melt in the microwave. Melt at 30 second intervals stirring each time. Pour the melted chocolate over the caramel, spread it out evenly and leave to set.
Once set, cut the shortbread into squares and store in an airtight container, in the fridge (it you want to keep them firm).
NOTE -
A dry clean glass bowl is better than plastic for melting chocolate in the microwave as glass retains heat.
The less you touch the chocolate layer the shinier it will look.
Keep your eye on the caramel mixture when microwaving, it can burn.
If you use a larger tin you may need more chocolate for the top layer.

Tuesday, January 18, 2011

Sweet Pizza

Nutella (Hazelnut Chocolate Spread) Strawberry Pizza
This is what my older son makes when we make pizza for supper, there is always extra dough and this is so easy to make that it's almost a sin not to make it. It's just lovely.

Pizza Dough
You can buy ready made dough or pizza bases but it is so easy to make your own that once you do it you will never buy ready made again. There are a few things that make all the difference when making dough. One is the flour you use, you need a strong baker's flour (plain flour with a high protein level), I use Molini Pizzuti fine Italian "00" flour (available at most supermarkets). The other thing that I found makes quite a difference is the tray you bake on, a preheated pizza stone would be ideal alternatively I use a pizza crisper (pan with little holes in the bottom).
Basic Pizza Dough
1kg plain flour
10g salt
10g sugar
20g dry yeast or 40g fresh yeast
660ml cold water
10ml vegetable/olive oil (optional)
NOTE - I divide the dough recipe in half and it makes more than enough for us (2 adults and 2 children).
As I don't like sticky fingers I use my mechanical mixer to make dough, and if you do use a mixer you have to use  a dough hook. Add the liquids to the bowl first followed by the dry ingredients. Good dough can be made in about 10 minutes this way. Be careful not to over mix the dough as it will become a sticky mess, the dough should be firm and smooth.
Once the dough has been made you divide the dough into individual balls ( a 200g ball of dough will make a 25cm/10 inch pizza). Make round balls of dough using the palms of your hands, weigh and cover them with plastic wrap (or you can cover with a clean tea towel). Let the dough balls rest for 10 to 15 minutes. Once rested (you will notice an increase in size) you can roll the dough on a floured surface to the desired shape and size.
Place on pizza baking tray and bake in a preheated oven 220 degC for 10 - 15 Minutes. For savory pizza pile on the toppings before baking.
Topping
Spread Nutella hazelnut spread over hot pizza, add sliced strawberries and sprinkle with icing sugar - enjoy.

Other sweet toppings - Caramel and banana, Toasted nuts and toffee.
Serve with whipped cream and or ice cream

Monday, January 17, 2011

Peanut Butter Chocolates


Peanut Butter Chocolates - Squares or Cups
Very easy, optionally quick no bake recipe, and oh so more-ish.
I found this recipe a few years ago in a magazine (cut it out and put it in my file so unfortunately don’t know exactly where it came from) and it has been a reliable recipe that I use rather regularly. Taste something like Reese’s Peanut Butter Cups. It can be made rather quickly in a cake pan and then cut into squares or if you have time and patience you can make little individual cups using paper chocolate cases, decorated with white chocolate.

Base
1/3 cup dark brown sugar
1 ½ cups icing sugar mixture
50g unsalted butter, at room temperature
¾ cup smooth peanut butter

Topping
250g chopped milk chocolate
25g chopped unsalted butter

1-Grease and line (with baking paper) a 23cm square cake pan.
2-Beat brown sugar, icing sugar, butter and peanut butter with an electric mixer until well combined. Press mixture evenly into the base of the prepared pan.
3-Place the chocolate and butter in a glass bowl and microwave on high at 30 second intervals, stirring, until it is melted. (alternatively melt the chocolate and butter in a heatproof bowl over a pan of simmering water)
4-Spread this over the peanut butter mixture and refrigerate for at least 2 hours, or until set.
5-Remove slice from pan and stand at room temperature for 5 minutes. Using a hot knife, cut the slice into small squares. Store in an airtight container in the refrigerator.

Thursday, January 13, 2011

The Australian Women's weekly - Kitchen

Kitchen
I got this book as a gift from a South African friend visiting about 3 years ago. This is a book filled with lots of advice and lots of information, covering the ideal kitchen, utensils, techniques, troubleshooting and some mouthwatering recipes. Since I am covering the sweet side of food I look at the sweet recipes and this book is full of them. This book covers everything in detail, so proves to be a great source to learn from. The recipes are accompanied by beautiful photographs as well as additional information. I love the "What happened to my cake?" section in this book as well as the extensive glossary. This is a great book to have in your kitchen.

Tuesday, January 11, 2011

Basic Scones


Scones
4 cups (600g) self-raising flour
2 tablespoons icing sugar
60g butter
1 1/2 cups (375ml) milk
3/4 cup (180ml) water (approximately)

1-Preheat oven to 220 deg.C. Grease or line oven tray.
2-Sift flour and sugar into a large bowl, rub in butter with fingertips (should resemble breadcrumbs).
3-Make a well in the centre of the flour and add milk and almost all of the water. Use a knife to 'cut' the milk and water through the flour, mixing to a soft, sticky dough. Add remaining water only if needed for correct consistency. Lightly knead dough on a lightly floured surface till smooth.
4-Press dough out evenly to 2cm thickness. Dip a 5cm round cutter in flour, cut rounds of dough and place scones, side by side, just touching, on tray.
5-Gently knead scraps of dough together and repeat cutting dough. Brush the tops with a little milk, bake for about 15 minutes or until scones are just brown and sound hollow when tapped firmly on the top with fingers.
6-Cool scones on a wire rack.
7-Dust scones with icing sugar. (optional)
Serve scones with jam and whipped cream.

NOTES
-Use cold butter chopped into small cubes.
-Make a soft, sticky dough and it should just hold its shape when turned out.
-Knead dough gently until it just comes together, over kneading will result in tough scones.
-Use minimum flour when handling dough. Lightly flour surface and hands and shape dough by gently working it into a manageable smooth shape.
-Do not roll/flatten dough thinner than 2cm, and use a sharp, flour dipped cutter.
-Glazing: Use a brush dipped in water, milk or egg. Water results in a light brown colour, egg in a golden brown colour and milk is a good compromise.
-Place them close together (just touching) on the tray and bake in a hot oven, scones need to rise quickly to be light.
-When cooling scones turn out onto a wire rack, for crusty scones cool them uncovered or to soften the crust wrap hot scones in a clean tea towel.

Coconut Rough Bars

Coconut Rough Bars
These are so quick and easy to make, the combination of a crisp biscuit base and soft sweet top are so delish. You will want more!

Biscuit base:
1 cup self-raising flour
125g melted butter
1/4 cup caster sugar
1/2 cup desiccated coconut
Topping:
1 cup icing sugar mixture
1 tablespoon cocoa powder
75g melted butter
1 cup desiccated coconut
2 tablespoons milk

1-Preheat oven 180degC. Grease and line base and sides of a 19cm x 29cm rectangular slice pan.
2-Sift flour into a bowl. Add melted butter, sugar and coconut and mix well. The mixture will look crumbly.
3-Press mixture into prepared tin and bake at 180deg C for about 20 minutes or until golden brown.
4-Prepare topping: Sift icing sugar and cocoa into a bowl, add the remaining ingredients and mix well.
5-Spread topping over the hot slice. Allow to cool, then refrigerate for 1 hour or until set. Cut into bars or triangles. Store in an airtight container in the fridge.

NOTE
- Pure icing sugar only contains cane sugar and Icing sugar mixture contains cane sugar and starch.
- Ensure that you press the base into the tin very well. The longer you bake the crispier the biscuit.
- Biscuit base can crumble a bit while cutting, use a serrated knife.
Variation - In biscuit base  add 1 less tablespoon of flour and add 1 tablespoon of coco powder to make a chocolate base.

Cake Pops by Bakerella

I love this book, just got it this Christmas (another gift to myself). I bought it at Kmart ($5 less than the bookstore). It is filled with inspirational creative ideas, great instructions and pictures to match as well as a great section on displaying, storing and shipping. What I love about cake pops is that you can use your left over cake from carved cakes as well as your extra icing/frosting - so no waste - and these babies can be frozen so you can have basic ones in your freezer and when the mood strikes you can pull them out and get creative. A great thing for kids to do too. Only thing is because it is American some of the 'ingredients' are harder to find here. Visit her at www.bakerella.com

Baking Tips

To create an amazing looking cake is one thing but the base, whether cake, cupcake or cookie is the first step and possible the most important thing to master. If you've got a good base to work with you are well on your way to creating a masterpiece.

The recipe - you want something that taste great but that you can work with, experiment and find your favorite recipes. I will post some recipes.
INGREDIENTS
1- Ingredients are key if you use good quality ingredients your end product will taste better.
2- Eggs should always be at room temperature.
3- Flour - there are different types of flour that contain different amounts of protein and are refined differently. Cake flour is more refined than all-purpose flour. Pastry flour has a lower protein content.
4- Whole milks fat helps bind the ingredients better.
5- Coco should have a 22 to 24% fat content and be the best quality.
6- Vanilla should be pure vanilla extract not imitation.
7- Butter, don't substitute butter with other spreads, the water quantities are different and you can taste the difference.

BAKING
1- Ovens - always preheat your oven to the require temperature, a cheap but useful tool is an oven thermometer, thus you will ensure that you oven is at the right temperature, always place your oven rack at the require height/level in your oven.
2 - Prepare baking trays and cake tins properly. I always line my baking trays with baking/parchment paper and I grease and flour my cake tins.
3- Follow directions, baking is quite a science different things react to each other and there are reasons for doing certain things (like stir, beat, cream, sift, blend, knead).

EQUIPMENT
1- Baking doesn't require much specialized equipment, however if you are baking on a more professional scale good equipment can make your life much easier.
2- Oven and stove should be in good working order (of course).
3- Microwave is a fast and easy alternative for melting chocolate, and heating ingredients.
4- Stand mixer, a sturdy mixer with paddle and whisk attachments are a great investment.
5- Baking trays, cupcake molds and cake pans, non stick are great, be aware that shiny silver and dark trays bake at different speeds.
6- Rolling pin is essential for making biscuits as well as pastry, invest in a good sturdy one.
7- Scale and measuring cups and spoons, ensure that these are accurate measurements (i.e. USA and UK use a 15ml tablespoon and Australia use 20ml tablespoon) according to the origin of the recipe.
8- Wire rack for cooling baked products.

Monday, January 10, 2011

Planet Cake Cupcakes

Another great book by Paris Cutler. This was my Christmas gift to myself, I got it for about $10 less than the RRP at Target. It is filled with some incredible cupcake designs and as with her previous book filled with great photos, detailed instructions and images, which makes it so easy to use. It goes beyond fondant and explains painting, airbrushing, among other techniques. A great resource!

Planet Cake

I got this book as a gift from my mother and it's been a fantastic resource. Filled with almost everything you need to know about decorating cakes with fondant, beautiful photos and step by step guides including pictures as well as fantastic cake projects - great teaching book.
Visit at http://www.planetcake.com.au/

Sunday, January 9, 2011

Cake Boss by Buddy Valastro


I bought this in November 2010 while in San Diego and it has proven to be a good buy. I am not much of an autobiography reader but this is different, perhaps because I watch Cake Boss on TV and already feel familiar with the characters, it is real and to top it he shares some really fantastic tips for bakers as well as some of his great recipes. Only thing - I would of loved more photos.

The book depository is a great place to buy books and they offer free world wide delivery.
www.bookdepository.co.uk

Pecan Wedges

Pecan Wedges
From the Cake Boss Book By Buddy Valastro

6 Sticks (3 cups/1 ½ Pounds) unsalted butter at room temperature
1 cup granulated sugar
2 extra-large eggs
¼ cup whole milk
4 cups pastry flour/all-purpose flour
1 cup light-brown sugar
3 tablespoons heavy cream
3 cups whole pecans
2 cups finely chopped semisweet good-quality chocolate

1-To make the dough – put 4 sticks of butter and the granulated sugar in a bowl of a stand mixer fitted with the paddle, and paddle on low – medium speed until thoroughly mixed, approximately 1 minute. Add the eggs and paddle until incorporated, approximately 1 minute. Add the milk and the pastry flour and mix until thoroughly blended, 30 seconds to 1 minute.
2-Wrap the dough in plastic wrap and chill until stiff enough to manipulate, about 30 minutes.
3-Preheat oven to 400F/200C, place oven rack in the center of the oven.
4-Divide the dough into four equal pieces. Lightly flour work surface and roll each piece of dough into a 18inch/45cm log, 2inches/5cm high. Place on a baking tray and flatten the center of the log so that it looks like a ravine, it should be about 3inches/8cm wide, fatter at the end than at the center. Crimp the edge at both sides. Repeat with all pieces of dough, leave a 2inch/5cm gap between the logs on the baking tray.
5-To make the caramel mixture – put the remaining 2 sticks of butter, the brown sugar and the cream in a saucepan and bring to the boil. Immediately remove from the heat and stir in the pecans. Spoon the caramel-pecan mixture into the ravine in the center of the logs. Bake for about 20 minutes or until golden brown.
6-Remove the trays from the oven and place the bars onto a cutting board, cut each bar crosswise into 4 or 5 wedges.
7-Melt the chocolate in a double boiler or in the microwave. Dip half of each wedge into the chocolate and place on a wire rack or baking paper, allow to set for about 30 minutes.
Can be refrigerated in an airtight container for up to 3 days.

I got lazy and made this as a pie with no chocolate – still tasted amazing, but in the future will try make it as chocolate dipped wedges.

Friday, January 7, 2011

Chocolate Almond Bars (I call them breakfast bars)

This is a recipe that I got from a friend in America - it's sweet, chewy, with a bit of a crunch and very morish!
This is like an entire breakfast for me - you've got your cereal, dairy (milk chocolate) and protien (Nuts).

1 Stick (1/2 cup/110g) butter or margarine
1 Cup packed light-brown sugar
2 Tbsp light corn syrup (alternatively golden syrup)
1 tsp vanilla extract
3 Cups (Kellogg's or no name brand) coco puffs/Krispies
1 Cup milk chocolate chips (can add more than a cup)
1 Cup Sliced or slivered unblanched almonds

Method
Heat oven to 350 F (180 deg C)  Line a 8-in/20cm square cake pan with heavy duty foil, folding foil over edges of pan.
Put butter in pan, melt in oven.  Add brown sugar, corn syrup and vanilla, stir to mix.
Add cereal and stir with a spoon, then mix with fingers until thoroughly coated/mix with spatula if like me you don’t like getting your hands dirty.
Place waxed paper on top and press down gently but firmly.
Bake for 20 - 25 minutes until entire surface is bubbly. Remove from oven.
Sprinkle with chocolate chips and let stand 5 minutes for chips to soften.
Spread chocolate chips, then sprinkle with almonds, pressing gently into chocolate.  Let cool , then refrigerate at least 1 hour or overnight before cutting.
Using foil as a lifter, remove from pan and, without inverting (almonds would fall off) peel off foil.  Cut into bars. Or cut and then remove from foil.  Store in refrigerator.
Makes 24 depending on size you've cut.

Tuesday, January 4, 2011

Peanut Butter Biscuits

Peanut Butter Biscuits

500ml flour
250ml white sugar
250ml brown sugar
125g margarine or butter (I used butter
1 egg
5ml bicarbonate of soda
125ml peanut butter

Sift the flour and mix in remaining ingredients to form a dough mixture. Roll into balls. (I squish the balls a bit so that they are a bit flatter). Place on a greased baking tray (I put baking paper on the tray so I do not grease it) and bake at 160 degrees C until golden brown (about 12 to 15 min). Cool on a wire rack. Store in an air tight container.
Makes 48
Can add chocolate chips, nuts, bits of crunchy yum....


Peanut butter biscuits - needs no frills
(plain, choc chip and crunchy)
2010

Shortbread

Shortbread house decorated by Dylan (7years old)

This recipe can be used for cut out shaped cookies, great for decorated biscuits, they are delish plain and do keep well in an air tight container, great for anyone who can't have egg! These are fool proof! Take note of A OR B in the instructions A for advanced B for B.lazy :-) and C for Clever

250g  butter
¼ cup castor sugar
1/3 cup icing sugar
½ cup cornflour
½ tsp. vanilla
2 ½ cups plain flour

Sift icing sugar and cornflour. Add sugar. Add butter and beat together. Add vanilla and flour. Mix.
A)Roll into a flattened ball and wrap in plastic wrap. Chill dough. Roll dough on floured surface and cut shapes, bake on a baking paper lined tray. OR
B)Press into 11" x 8" tin.
C)Get a friend to bake and share
A and B) Bake at 180 deg.C

A)Time 12 to 15 min Depending on size of biscuits

B)Time 25 to 30 min
A)Cool on pan for a few minutes before transfering to a wire rack to cool.
B)Take out and cut squares/rectangles when still hot. Then cool on a wire rack if you like or just eat straight out of the pan.
C)Eat

Xmas Shortbread for the boys to decorate
2010

Monday, January 3, 2011

Out Of The Box - Muffins

OK, so I know this is a bit of a cheat - or you could look at it as smart - I choose the later!
Create your own flavor Muffins
Ingredients
- Green's Multi Purpose Muffin Base
- Ingredients according to the box (1 egg, 1 cup water, 1/4 cup Veg oil)
- Ingredients according to the flavors you want to create (Frozen mixed berries, White, Milk and Dark Chocolate, Chocolate spread, Instant espresso coffee and brown sugar dissolved in hot water)
How To
Mix muffins according to package instructions, preheat oven and line/grease muffin tins.
Separate muffin mix into 3 bowls or more depending on how many different flavors you plan to create.
Begin adding flavors.
White chocolate roughly chopped and mixed berries.
Chocolate spread and milk chocolate roughly chopped.
Dissolved espresso, brown sugar and dark chocolate. I added walnuts to some of these.
Bake according to package instructions - I did make mini muffins thus I only baked them for 15 minutes and this mix made 50 muffins.
Once the muffins had cooled and of course been taste tested, I did 'decorate' them with some more chocolate.
I found this Muffin Base really good and would recommend it to anyone. Of course
you could bake these from scratch and not use the box!

Sunday, January 2, 2011

The naked truth

I am going to keep this short and sweet. the seed has been planted. (actually was planted an hour ago - but still trying to figure this all out)
February 2011 one month in.
So I have done some work on this blog, still figuring out how blogging works and am now working on a recipe post for my decorated biscuits, got to do the dough and photos then will post it. I have been doing a fair amount of baking and I suppose experimenting with some success as well as 'lessons learnt' (rather than failures), as well as lots and lots of reading ... which will eventually get posted here somewhere. So gained some personal knowledge and a few kilograms and will keep blogging happily.